VSP-C1 User Manual
This is the comprehensive User Manual for the VSParticle Controller (VSP-C1). The Quick Start Guide is available as a quick reference for standard operation of the VSP-C1 unit.
| Company | VSParticle B.V. | |
|---|---|---|
| Address | Molengraaffsingel 10 2629 JD Delft The Netherlands | |
| Website | vsparticle.com | |
| Support e-mail | support@vsparticle.com |
Introduction
The User Manual provides instructions for the set-up, installation, operation and maintenance of a VSParticle C1 Controller (“VSP-C1”) unit.
If you have any questions or concerns regarding the VSP-C1 unit you have purchased or any information within the provided user documentation, please contact us via the contact details at the top of this page.
The VSP-C1 is designed for use by researchers who want to produce inorganic nanoparticles from conductive materials for applications in fields ranging from cluster research to materials science.
The VSP-C1 is designed for users who want to control experiments with the VSP-G1 and MFC+ to produce inorganic nanoparticles from conductive material for applications in fields ranging from cluster research to material science. The VSP-G1 (“Generator”)is a desktop spark generator that uses spark ablation technology to produce aerosol nanoparticles after a high voltage spark evaporates part of two metallic electrodes. The MFC+(“mass flow controller”) is a desktop device that has a mass flow meter (i.e. the sensor) combined with control valve and feedback electronics between sensor and valve.
The VSP-C1 is designed to have a versatile control system with software that enables easy to use interface to control the experiment.
System description
What's in the box
Congratulations on your purchase of the VSP-C1! In the box you will find the following:
If there's anything missing or looks damaged, contact us immediately at support@vsparticle.com or using the contact details at the top of this page! A damaged power supply cable may temporarily be replaced by a similar cable, but ensure it has a functional protective earthing terminal.
Settings
Starting the C1 for the first time
Set the correct date, time, and time zone:

- Tap in the menu bar on Settings
- Select the Time & Date
- Set the correct date, time, and timezone
Connecting to C1 Wi-Fi
Operating system
Setpoints & Scheduling

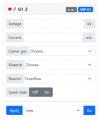
With the VSP-C1 you can directly control the supply of the VSP-G1 voltage and MFC+ flowrate. The two base elements are shown in the base module, as can be seen on the photo …. .
The setpoints can be filled in for the MFC+ and VSP-G1. For the MFC+, the flowrate in l/min, gas type, and limit pres. in mbar can be set. The VSP-G1 the voltage in kV, current in mA, material, reactor, spark state, and glow avoidance can be set. In the ‘Apply’ section you can schedule your experiment when you are finished with the filling in the setpoints. The options are between now, in such minutes, and at what time.
-

Apply now, in, or at,
-

Scheduled events

In the schedule events section, you can view your experiment settings, device, and setpoints.
Optional G1 or MFC+
It could be that you have chosen for multiple G1’s or MFC+ in the series. The extra setting will be shown in the software and with the option to customize the belonging setpoints. An example is shown in the figure … . This illustrates an extra G1 that is called G1_2.
-
Optional G1_2

Monitor Metrics
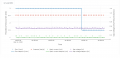
The Monitor Metrics section shows the values per setting. It provides an overview of the current value that is observed during the experiment.
The G1 & MFC graph shows the flow [l/min], flow setpoint [l/min], pressure [bar(a)], spark current [mA], spark current setpoint [mA], gap voltage [kV], and gap voltage setpoint [kV] for definite timeframe. This overview of the graph provides insight into these values during the experiment.
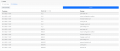
In the Scheduling C1 the timestamp, source, and message are noted in order to retrieve all control logs.
-

Monitor Metrics,
-
G1 & MFC graph,
-
Scheduling C1


Data management & Download
The data during the experiment is logged and therefore can be downloaded in the menu bar under “Data”. The following options can be found: download, disk space, disk clean-up. The download option allows you to select your data with a start and end date and download it in a csv. The disk space shows how much space is left in megabytes and percentage in the disk space. The last section is the disk clean-up where data can be manually removed from 10, 25, 50, or 100 days. You can also choose to rebuild the database. The deleted data cannot be recovered and will be lost after deletion.
Data download

To download the data from the C1 follow the following instructions:
- Tap in the menu bar on Settings
- Select the start and end time
- Click on Download to get the data in a CSV format
Disk space
To check for cleaned disk space, go to the Disk space in Data menu bar. Here you can check how much percent is used and check how many megabytes are left on the disk space.
Disk cleanup
It could be possible that you are not able to download your data. This might be caused by a full disk space. The following steps help you to delete data:
- Tap in the menu bar on Data
- Go to the section of Disk clean-up and click on Choose…
- The following option appear:
-
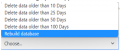
Delete data older than

- Choose your option and click on Execute